Quick Start
Sample Design
In the examples/ directory of the source code distribition a sample Verilog design and testbench for a DES encryptor can be found as des.v.
10 :/home/bybell/gtkwave-3.0.0pre21/examples> ls -al
total 132
drwxrwxr-x 2 bybell bybell 4096 Apr 30 14:12 .
drwxr-xr-x 8 bybell bybell 4096 Apr 29 22:05 ..
-rw-rw-r-- 1 bybell bybell 187 Apr 29 22:09 des.sav
-rw-r--r-- 1 bybell bybell 47995 Apr 29 22:05 des.v
-rw-rw-r-- 1 bybell bybell 68801 Apr 29 22:06 des.vzt
If you have a Verilog simulator handy, you can simulate the design to create a VCD file. To try the example in Icarus Verilog (http://www.icarus.com), type the following:
/tmp/gtkwave-3.0.0/examples> **iverilog des.v && a.out**
VCD info: dumpfile des.vcd opened for output.
/tmp/gtkwave-3.0.0/examples> **ls -la des.vcd**
-rw-rw-r-- 1 bybell bybell 3465481 Apr 30 13:39 des.vcd
If you do not have a simulator readily available, you can expand the des.vzt file into des.vcd by typing the following:
/tmp/gtkwave-3.0.0/examples> vzt2vcd des.vzt >des.vcd
VZTLOAD | 1432 facilities
VZTLOAD | Total value bits: 22921
VZTLOAD | Read 1 block header OK
VZTLOAD | [0] start time
VZTLOAD | [704] end time
VZTLOAD |
VZTLOAD | block [0] processing 0 / 704
/tmp/gtkwave-3.0.0/examples> ls -la des.vcd
-rw-rw-r-- 1 bybell bybell 3456247 Apr 30 13:42 des.vcd
You will notice that the generated VCD file is about fifty times larger than the VZT file. This illustrates the compressibility of VCD files and the space saving advantages of using the database formats that GTKWave supports. Normally we would not want to work with VCD as GTKWave is forced to process the whole file rather than access only the data needed, but in the next section we will show how to invoke GTKWave such that VCD files are automatically converted into LXT2 ones.
Next, let’s create a stems file that allows us to bring up RTLBrowse.
/tmp/gtkwave-3.0.0/examples> verilator -Wno-fatal des.v -xml-only
--bbox-sys && xml2stems obj_dir/Vdes.xml des.stems
/tmp/gtkwave-3.0.0/examples> ls -la des.stems
-rw-rw-r-- 1 bybell bybell 4044 Apr 30 13:50 des.stems
Stems files only need to be generated when the source code undergoes file layout and/or hierarchy changes.
Now that we have a VCD file and a stems file, we can bring up the viewer.
Launching GTKWave
We already have a VZT file available, but to illustrate the automatic
conversion of VCD files, let’s use the -o option. The -t option is used
to specify the stems file. The .sav file is a “save file” that contains
GTKWave scope state.
/tmp/gtkwave-3.0.0/examples> gtkwave -o -t des.stems des.vcd
des.sav
GTKWave Analyzer v3.3.18 (w)1999-2010 BSI
FSTLOAD | Processing 1432 facs.
FSTLOAD | Built 1287 signals and 145 aliases.
FSTLOAD | Building facility hierarchy tree.
FSTLOAD | Sorting facility hierarchy tree.
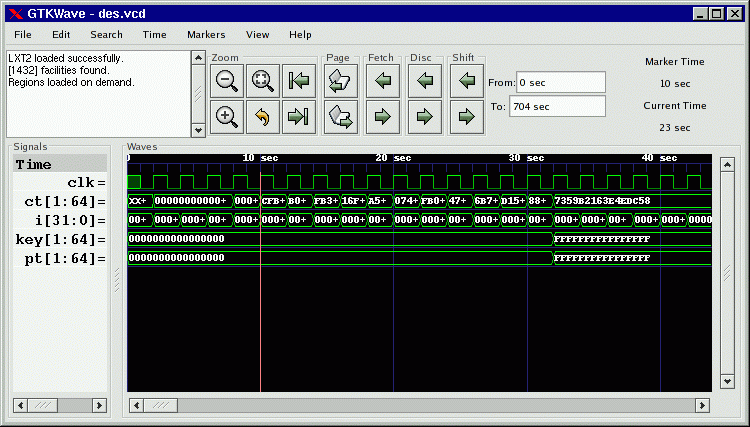
The main window with viewer state loaded from a save file
In some cases, for example if the dumpfile format is LXT2, you will see two sets of loader messages. This is normal as RTLBrowse is launched as an external process in order to keep its operations from bogging down the viewer. After these messages scroll by, the GTKWave main window and an RTLBrowse hierarchy window will appear. We are now ready to start experimenting with various features of the wave viewer and RTLBrowse.
The RTLBrowse window will come up as seen in on page, however none of the tree nodes will be opened yet.
Displaying Waveforms
In the preceding section, the viewer was brought up with a save file so
when the viewer did appear, the main window already had signals present
as seen in on page . All the signals in a model do not appear on their
own as this would be unwieldy for large models. Instead, it is up to the
user to import signals manually. An exception to this exists for VCD files, see
the definition of the enable_vcd_autosave .gtkwaverc variable.
That said, several requesters exist for importing signals into the main window.
Signal Search
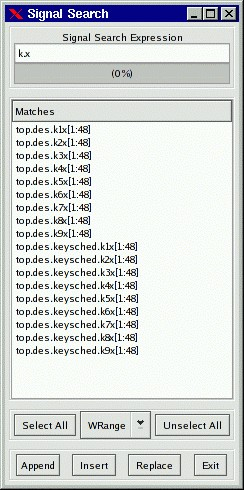
The Signal Search (regular expression search) Requester
The signal search requester accepts a search string as a POSIX regular expression. Any signals found in the dumpfile that match that regular expression are listed in the Matches box and may be individually or multiply selected and imported into the viewer window. The regular expression can be modified in one of four ways: WRange, WStrand, Range, and Strand. No modification is possible with None. This optionally matches the string you enter in the search string above with a Verilog format range (signal[7:0]), a strand (signal.1, signal.0), or with no suffix. The “W” modifier for “Range” and “Strand” explicitly matches on word boundaries. (addr matches unit.freezeaddr[63:0] for “Range” but only unit.addr[63:0] for “WRange” since addr has to be on a word boundary.) Note that when “None” is selected, the search string may be located anywhere in the signal name.
Append will add the selected signals to end of the display on the main window.
Insert will add selected signals after last highlighted signal on the main window.
Replace will replace highlighted signals on the main window with signals selected.
Hierarchy Search
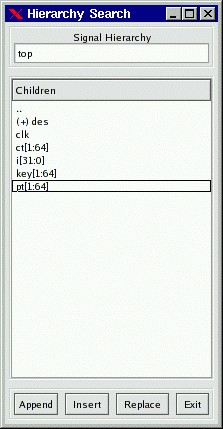
The Hierarchy Search Requester
The hierarchy search requester provides a view of the hierarchy in a format similar to the current working directory of a file in a file system on a computer. The Signal Hierarchy box contains the current hierarchy and the Children box contain all of the signals in that immediate level of hierarchy and all of the component instantiation names for that level of hierarchy (denoted by a “(+)” prefix). To navigate down a level of hierarchy, click on an item with a “(+)” prefix. To move up a level of hierarchy, click on the “..” line.
Selecting individual items allow you to import traces singly when the Append, Insert, or Replace buttons are clicked. Not selecting anything will do a “deep import” such that all the child signals are imported. Use of that feature is not recommended for very large designs.
Note that is is possible to modify the display order such that components and signals are intermixed in this gadget rather than being separated such that all the components for a given level of hierarchy are listed alphabetically at the top and all signals are listed alphabetically at the bottom. In order to do this, toggle the Search submenu item Search Hierarchy Grouping as described on page 43.
Tree Search
The Tree Search Requester is the requester that most users will feel comfortable using and is also the requester that can optionally be embedded in the main window on versions of GTK greater than or equal to 2.4. See on page for an example of this.
The Tree Search Requester is composed of a top tree selection box, a signals box, and a POSIX regular expression filter. The tree selection box is used to navigate at the hierarchy level. Click on an item in order to show the signals at that level of hierarchy. In the figure on page , the “top” level of hierarchy is selected and the signals box shows what signals are available at that level of hierarchy. Signals may be individually or multiply selected and can be dragged and dropped into the signal window. In addition, a POSIX filter can be specified that allows the selective filtering of signal names at a level of hierarchy which is handy for finding a specific signal at a level of hierarchy that is very large (e.g., in a synthesized netlist).
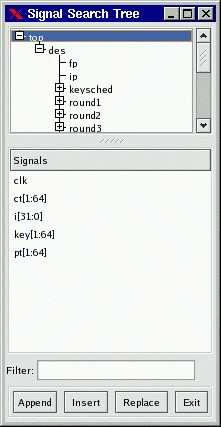
The Signal Search Tree Requester
Signal Save Files
The signals show in the main window can be saved to a file so they can automatically be imported without reselection the next time the viewer is started. In order to save signals to a save file, select the File submenu option Write Save File (As). Save files can also be loaded at any time by selecting the Read Save File option.
Pattern Search
Values, not only nets may be searched on and marked in the wave window. In order to do this, select one or more nets in the signal window and then click on the Search submenu option Pattern Search. A Pattern Search Requester will then appear that will allow various types of search operations for the signals that have been selected.
The following is an example of a Pattern Search Requester being used to mark the rising edges for the clock signal in a simulation model.
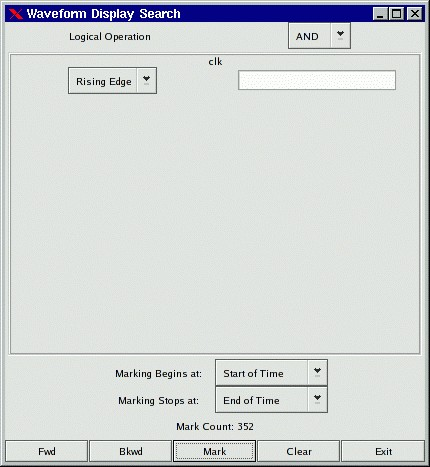
The Pattern Search Requester
The edges as they are marked by the configuration of the Requester in Figure can be seen in on page .
To remove pattern marks, either select another pattern or select the View submenu option Remove Pattern Marks. Note that pattern marks save to the save file and that the actual pattern search criteria is saved, not the absolute times of the individual marks themselves.
Search criteria for individual nets can be edge or value based. For “String” searches (the entry box to the right of the search type box which in the case above is marked “Rising Edge”), note that is is no longer required that you must press Enter for the string in order to commit the value to the search.
Alias Files and Attaching External Disassemblers
The viewer supports signal aliasing through both plaintext filters and through external program filters. Note that signal aliasing is a strict one-to-one correspondence so the value represented in the viewer must exactly represent what format your filter expects. (e.g., binary, hexadecimal, with leading base markers, etc.) For your convenience, the comparisons are case insensitive.
For text filters, the viewer looks at an ASCII text file of the following format:
#
# this is a comment
#
00 Idle
01 Advance
10 Stop
11 Reset
The first non-whitespace item is treated as a literal value that would normally be printed by the viewer and the remaining items on the line are substitution text. Any time this text is encountered if the filter is active, it will replace the left-hand side text with the right-hand side. Leading and trailing whitespaces are removed from the right-hand side item.
To turn on the filter:
Highlight the signals you want filtered
Edit->Data Format->Translate Filter File->Enable and Select
Add Filter to List
Click on filter filename
Select filter filename from list
OK
To turn off the filter:
Highlight the signals you want unfiltered.
Edit->Data Format->Translate Filter File->Disable
!!! note Filter configurations load and save properly to and from save files.
An external process that accepts one line in from stdin and returns with data on stdout can be used as a process filter. An example of this are disassemblers. The following sample code would show how to interface with a disassembler function in C:
int main(int argc, char **argv)
{
    while (!feof(stdin)) {
        char buf[1025], buf2[1025];
        buf[0] = 0;
        fscanf(stdin, "%s", buf);
        if (buf[0]) {
            int hx;
            sscanf(buf, "%x", &hx);
            ppc_dasm_one(buf2, 0, hx);
            printf("%s\n", buf2);
            fflush(stdout);
        }
     }
    return 0;
}
Note that the #!c fflush(stdout) is necessary, otherwise gtkwave will
hang. Also note that every line of input needs to generate a line of
output or the viewer will hang too.
To turn on the filter:
Highlight the signals you want filtered
Edit->Data Format->Translate Filter Process->Enable and Select
Add Proc Filter to List
Click on filter filename
Select filter filename from list
OK
To turn off the filter:
Highlight the signals you want unfiltered.
Edit->Data Format->Translate Filter Process->Disable
Note: In order to use the filter to modify the background color of a trace, you can prefix the return string to stdout with the X11 color name surrounded by ‘?’ characters as follows:
?CadetBlue?isync
?red?xor r0,r0,r0
?lavender?lwz r2,0(r7)
Legal color names may be found in the rgb.c file in the source code
distribution.
Transaction Filters
Either single traces or grouped vector data (created by Combine Down (F4) on some signals) can be used to signify a transaction that can be parsed by an external process.
An external process that can accept a simplified VCD file from stdin and return with trace data on stdout can be used as a transaction filter. An example of the VCD file received from stdin is the following:
$comment data_start 0x124c0798 $end
$comment val[7:0] $end
$timescale 1ms $end
$comment min_time 0 $end
$comment max_time 348927 $end
$comment max_seqn 1 $end
$scope module top $end
$comment seqn 1 top.val[7:0] $end
$var wire 8 1 val[7:0] $end
$upscope $end
$enddefinitions $end
$dumpvars
#0
b10000000 1
#1
b10000101 1
#2
b10001010 1
...
#348927
b110010 1
$comment data_end 0x124c0798 $end
To aid in processing and parsing, some extra comments are added to the VCD file:
data_start, a value to match against data end to know that all trace data has been receivedmin_time, the start time of the wave datamax_time, the ending time of the wave datamax_seqn, indicates the relative ordering of the trace data being presented. This can be used to provide “anonymous” signal name matchingseqn, gives the “flat earth” signal name
Note that the VCD identifies are numbers starting from 1. These are to
be correlated with the max_seqncount.
An example of data generated on stdout after all data has been received is as follows:
$name Decoded Data
#0
#186608 ?darkblue?sync
MA196608 Sync Mark
#196860
MB196864 Num Blocks
#196864 ?gray24?04
#197116
MC197120 Hdr 0
#197120 ?purple3?04
#197372
$next
$name Another Trace
#0
#10000 This is a test!
#200000
$finish
Time values with no data after them are rendered as a horizontal “z” bar.
Lines that start with M are used to place the markers A-Z.
$nameindicates the name to give to the trace.$nextindicated that more trace data follows for a new trace.$finishis used to signal to gtkwave that there is no more trace data.
The data received by gtkwave will be used to generate transaction traces
in the viewer. In order to make traces created by $next visible, insert
blank lines under the trace that the transaction filter has been added.
To turn on the filter:
Highlight the signals you want filtered
Edit->Data Format->Transaction Filter Process->Enable and Select
Add Transaction Filter to List
Click on filter filename
Select filter filename from list
OK
To turn off the filter:
Highlight the signals you want unfiltered.
Edit->Data Format->Transaction Filter Process->Disable
Note: In order to use the filter to modify the background color of a trace, you can prefix the return string to stdout with the X11 color name surrounded by ‘?’ characters as follows:
?CadetBlue?isync
?red?xor r0,r0,r0
?lavender?lwz r2,0(r7)
Legal color names may be found in the rgb.c file in the source code distribution.
Debugging the Source Code
See the description for RTLBrowse on page 30. More features are planned to be added in future releases.